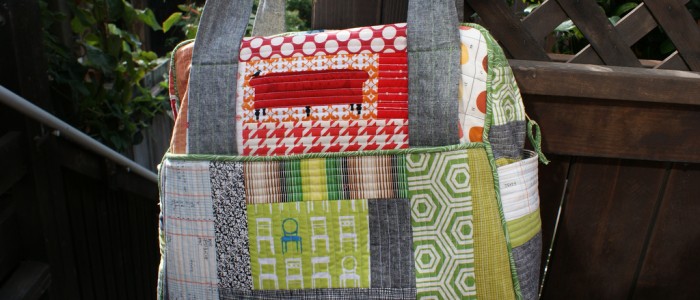
Girl on the Rocks

formerly known as Knit This… Knitting, spinning, crafting - it’s all here.


Here’s what’s happening July 2, 2008

After nearly a month of not blogging, i thought i should let you know that I am still around.

I’ve done a little knitting


Ravelry Project Page

A little spinning


California Red locks from A Verb for Keeping Warm Raverly page

and…. i adopted a kitty! Introducing… Bean!


She’s mouthy (like me). This last picture is a video…. Click through to hear Bean!


insane number of kitty pics in my flickr stream.

Related posts

Tags: ,


Together at last April 30, 2008

Filed under: Crafty, Etsy Shopping — karrie @ 6:24 am

I have finally created the perfect product to unite my love of the Fiber Arts and my fascination with disembodied moustaches. The ‘stache for your stash, or a ’stache sachet, if you will (the anagram was irresistible).


There are two versions available. The Stash ’stache is filled with the natural moth repellents cedar chips, and lavendar with added pennyroyal essential oil to protect your yarn and fiber from bugs. A variant on the original contains only lavender and can be used as a traditional sachet - perhaps finding a home in a drawer with your unmentionables.

Abby, Ingrid and I printed up the bags on my gocco. They have a ’stache on one side and “Girl on the Rocks” on the other.


Head over to my shop and pick one up!

Related posts


Why I am still saving my junk mail April 16, 2008

Filed under: Crafty — karrie @ 7:02 am

I am a little kitschy, and wouldn’t necessarily say I am always tasteful and stylish. Oh, and I am SO not a designer. So it is cool to see that the smarties at design*sponge think like me sometimes - they posted an inside out envelope tutorial too. I can’t resist pointing out that I did it a month earler :)

After I posted my inside-out-envelope tutorial, some back linking led me to the Junk Mail Gems blog. Wow! Gretchen is a master re-purposer with a shop filled with awesome recycled projects.
Security envelope paper beads at Junk Mail Gems

So with security envelopes still on the brain, and a giant pile growing on my desk, I used some to decorate some 3×5 recipe cards. I used a few round hole punches to add some accents.


Nice nice nice. It is the greatest free paper around. I even used some to make product tags for my fibery goods in prep for the upcoming Color Fiber Festival. (Can you tell that I am trying to link to the festival in every post… Is it obvious?)

Get more security envelope inspiration from the Flickr Security Pattern Group.

Related posts


Luck o the irish March 17, 2008

Filed under: Crafty, Finished Projects, patterns — karrie @ 12:23 pm

Happy St. Patrick’s day!

last week I was goofing off with my crochet hook and thinking about St. patty’s day. i thought I might make a four-leaf clover… I found a few shamrock patterns, but none of them had 4 leaves! After a few failed attempts, here is my version.

This pattern is probably intermediate in difficulty: it requires that you are able to cast on in a magic ring, double crochet (dc) and treble crochet (tr). it can be done in any yarn as long as you use an appropriately sized crochet hook. The larger one I made used caron simply soft worsted weight yarn and a size F hook.

- [sc in ring, ch 1] 4 times end sc 1.
- sc 2 so you begin work in the space created by the ch1 of the first row.
Work each leaf in the space created by the ch1 of the first row.
- ch1, tr1, dc1, tr1, ch2. slip stitch into sc from first row to end the leaf. sl into space created by ch1 from first row to start the next leaf.

Repeat the leaf pattern 4 times (3 times more) and you should be almost all of the way around.

Make stem:

- ch 5
- sc 4 starting in second ch from hook. (you are working your way back up the stem toward the leaves.
- sl st. break yarn, pull through and weave in the end.

Let me know if you have any problems with the pattern! See if you can trade them for some free beers tonight!

Related posts


I don’t speak or read Japanese. Is that a problem? March 10, 2008

Filed under: Crafty, Karrie's Current Projects — karrie @ 6:57 am

Pretty much without even a second thought, I recently bought a few Japanese craft books in Japantown. These are my first, and while I don’t speak or read Japanese, everyone always says the diagrams are so good that you can figure everything out from the pictures.

Well, they are mostly right. So far my experience is just with crochet which hasn’t been too bad. Instead of having row by row directions, all of the patterns are represented in charts. In each book there is a section where they define what the symbols mean, and have some of the best instructional diagrams I have ever seen. I dare say the ambitious could teach themselves to crochet from these diagrams.

I made it through my first pattern by flipping back and forth between the chart and the instructions with almost no problem. Now I am not sure that I even want to ever read a non-charted crochet pattern again!

Every once in a while I do wonder things like “What is the title of this book?” and “That little arrow is labelling something that is clearly important. I wish I could read what it says…” I am trying to compile a list of helpful online sources for translation, but many are for knitting… i’m working on it…. in the mean time, if you have a japanese pattern that you are trying to read, I have found some friendly, helpful Ravelers in the Japanese knitting and Crochet group and Tawashi Town.

If you don’t know what a Tawashi is (I didn’t until last week), stay tuned because they are cute cute cute!

Related posts


It’s like a wooden frame but it’s not March 7, 2008

Filed under: Crafty — karrie @ 5:15 am

i felt so lucky when I found these at the east bay depot, and the price was great. They are the nicest emboidery hoops I’ve ever seen

The outer ring is flexible rubber with a faux bois pattern. They are much easier to deal with than the flat sided wooden or plastic ones, and they wouldn’t look too bad hung up on the wall. I thought I was super-special and a few ebay and google searches revealed that these were pretty widely available in the UK. I smugly thought about how much cooler that made them, but then lamented the fact that I couldn’t get more.

I found them at Michael’s this weekend. When they go on sale… Watch out!! I’m stocking up.

Related posts


Repurposed Security Envelopes February 5, 2008

Filed under: Crafty — karrie @ 1:54 pm

You know all those envelopes that come with your credit card bill? i never use mine since I make my payments online. I always feel a little bad about throwing away a perfectly good envelope, so I decided to reuse them. Basically, I turned them inside out and added a little color. Now they are good to go. Want to know how? An abridged tutorial follows, and excruciating detail is available in my Flickr Set. click any of the photos for a larger version….

here’s what you need:

- Envelopes
- Glue Stick
- scissors
- Decorative paper
- Avery-type blank address labels or something similar.
- Freebie mailing labels (optional)
- Double-sided tape and regular transparent tape (optional - you need both or neither of these).

Before you start, cut the decorative papers to a size that is about 1/4 inch larger than the window in the envelope.


Gently peel open the envelope at the seams, and coax it with scissors if necessary. I have been really lucky and had no problem with this part.


Flip the envelope over so you are looking at the white side. Next, you need to block the little cello window. Place glue around the window being careful not to get anything on the window.

Place the decorative paper fancy side down on the glue.


Fold up the bottom of the envelope, and add glue to the side edge. now you can reconstruct the seam that you ripped open earlier. repeat on the other edge of the envelope.

Now you might start fretting about the fact that the glue is on the outside of your envelope.

I would recommend not worrying about it and just tucking the flap in after you moisten the glue. If you don’t like this idea, here is where you need 2 kinds of tape. Cover the original envelope glue on the outside with a piece of transparent tape (you don’t want it to get damp and stick to everything in the mailbox!). Then on the inside of the flap where you would expect the glue to be, place a strip of double sided tape. Don’t peel off the protective paper until you are ready to seal the envelope.

As an alternative to decorative paper, you can also use out-of-season freebie address labels to cover up the window.

This will be white when you flip the envelope over. As far as I can tell*, you could probably just use a sharpie and write on the cello window to address the envelope, and you’re done.

If you used decorative paper, you will need to add a white address label to make a position to write the destination address. Can you imagine how the USPS machines would freak out if you wrote the address on the security pattern?

That’s it! If you try it, i would love to see how your envelopes turn out!

* As far as I can tell, the only USPS requirement for the placement of the destination address is that it should be parallel to the long edge of the envelope.

Related posts


Damask January 21, 2008

Filed under: Crafty — karrie @ 8:31 pm

I have a soft spot for intricate, velvety wallpaper. Luckily I get my fix about once a week at the Mel-o-Dee where my knitting group meets. While I was visiting Los Angeles a few months ago, I ran across a crazy bathroom that had 5 different kinds of flocked damask wallpaper, and I took some pictures.

In fact, i started a Flickr group. So if you are out in the wild and see some wallpaper, take a picture and send it my way…

My recent Damask discoveries don’t end with wallpaper. A bit of browsing at Reprodepot has revealed the most fantastic modern Damask ever - Echino Woodland

Echino Woodland Fabric

Click through and check it out…. Hidden in the patter are skulls, bugs, and woodland animals. it is amazing. Too bad it costs an arm and a leg (also available at Superbuzzy).

I also found one more Animal damask - this one featuring only rabbits.

Bunny Damask

I would love to have these on my walls!

Related posts


I never thought I would say it January 11, 2008

Filed under: Crafty — karrie @ 1:11 am

I think i like stamps.

I have never really had much interest in stamps. Then I realized that they are an excellent vehicle for the proliferation of moustaches, and I started thinking about them a little more. I think they are also very well suited for creating my etsy packaging. i can just use a stamp to customize any re-purposed envelope or turn any scrap of paper into a tag. It’s cheaper and more flexible than color printing, and you are only limited by the colors of your stamp pads.

I haven’t liked most of the stamps I have seen in the store, which kind of turned me off to them all together, but then I started seeing hand carved stamps popping up here and there…

Inspired mainly by the uncontrollable cuteness of the hand carved stamps over at Mushroom Meadows (specifically this post) and at Little Thing, and by Jezze’s awesome lino prints I decided I had to try and make one of my own. I snagged some lino carving tools and a mini cutting mat at Daiso the first time I was there, and I picked up some Soft Kut from the Art store on my corner.

I had so much fun and it turned out so well that I have been making one stamp each night before bed. And each night I declare that the one I just made is the cutest thing I have ever seen, and is my new favorite.

Tonight I just finished a piece of Bamboo, which completes my “Fiber Content” set. I wanted something to represent a sheep (wool) a soybean (soysilk) and bamboo for labeling my roving.

I think it is going to work!

.

There are a few more pics in my Flickr set. References follow:

Two tutorials that I found by searching on the Craft: blog - Mindful Craftiness and Alma Stoller

Plenty of supplies can be found at Dick Blick if you have one nearby. Many people also use little erasers instead of hunting for carving medium. I got mine from Artist and Craftsman’s Supply since I can walk to it. If you want to order online, Stampeaz looks like they have everything.

Related posts


Gifts for the crafty - Part ii - Fabric December 6, 2007

Filed under: Crafty — karrie @ 2:26 am

Fabric is one of the staple materials for crafters, and a great fabric can bring a drab project to life. If you are shopping for a crafty friend and you are not sure if they have a sewing machine, recommend buying a gift certificates. All of the places I’ll mention have plenty of craft notions and kits…

Online Fabric sellers

  • Superbuzzy: One of the biggest selections of japanese import fabrics that I find nearly irresistible.

  • Reprodepot You can find a smattering of japanese import fabrics here, but also many vintage reproduction fabrics (hence the name). i am also a bg fan of their numerous apron patterns.
  • J. Caroline Creative This is an awesome one-stop online fabric shop. They have my favorite fabric designers (Alexander Henry, Michael Miller, Kaufman) and a fantastic selection of canvas, duck cloth and corduroy. The notions that have are super-useful too - magnetic snaps, ribbons, and purse handles to name a few.

Related posts