Canning for one – Kumquat Marmalade
I like canning food. In fact, sometimes I think I like canning things more than i like eating them… I have quite a batch of uneaten preserves. In the past, all of my canning adventures involved many flats of berries, or pounds and pounds of beans and took all day. Now that I live in a studio apartment I just don’t have room for that kind of operation and I have said goodbye to canning at my own pad. But, I could not resist the quinces and kumquats that I found for an awesome discount in the bruised fruit section of the Berkeley Bowl. I looked at them, and immediately imagined them as jammy delicousness. I also realized that maybe canning didn’t have to be an all day project and was a perfect excuse to wear one of my new aprons…. Here is some of the stuff I figured out, and some of the ingredients I used (since I didn’t measure anything, I can’t really call it a recipe*).
I dug out my supplies
- Canning jars, rings and new lids
- Ikea stock pot with steamer/colander insert
- Two saucepans
- Jar Lifter and funnel
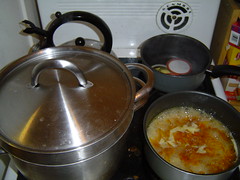
The stock pot is for boiling water to sterilize the jars, and is the key development for canning in a tiny kitchen. I have a standard canning pot, and it covers two burners on my little efficiency stove, and would prevent me from beign able to simmer jars, jar lids, and my jam at the same time. The stock pot is much a much smaller substitute. Since glass jars don’t do well in boiling water when sitting on the bottom of a pot, I used the insert to keep them off the bottom. Since this pot is much shallower (and smaller) than a standard canning pot, make sure that it will be deep enough to cover your jars wth water. I could only fit in shorter jelly jars.
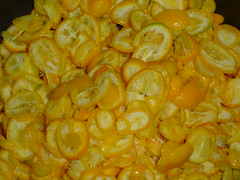
Fill up the stock pot with water, and wait for it to boil (this takes a while). When it does, add the jars. Meanwhile, cook the fruity contents. I sliced up the kumquats (2 cups?) and added enough water to cover the fruit by about an inch in my saucepan.
I let this cook for about half an hour. Then I added a lot of sugar(2 cups?) and some lemon juice. If I wanted to not have to fret over whether my concotion would gel up like jam i could have added pectin at this point, but I decided to risk it. Plus, I think adding pectin is a little bit of a cheat. Then I let this cook for a while, until the fruit was syrupy. I put a splash of it in a cold bowl (that I stuck in the freezer when I started) and it quickly cooled and thickened. If it was still runny and syrupy, I would have cooked the fruit mixture longer. I also could have checked the temperature had I not left both (yes I own two) of my candy thermometers in a pot of oil at the thanksgiving turkey deep-fry that I attended.
To sterilize the jar lids, put them in a saucepan and heat them up, but keep it below a boil… Make sure you use NEW lids. They cannot be reused!
click through to flickr to see notes
Here is where a set of canning tools pays for itself. Use the jar lifter to fish the hot jars out of the pot, and dump out the water inside.

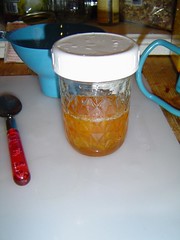
Stick in the funnel, and pour in the kumquats

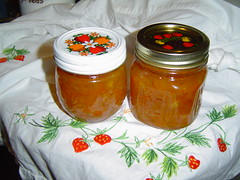
Wipe off the rim of the jar, and add the lid and loosely screw on the ring. I had enough fruit for a little over two jars. I put the two jars back in the hot water to process. This sterilizes everything and also seals the jars. I put the leftover in another jar with a screw to plid and stuck it in the fridge for immediate consumption.
2.5 jars of jam. It is an all time low for me, but I couldn’t be happier about it.
*If you haven’t canned anything before, you will need more than this for reference. Sterilization and proper processing is very important. I recommend the Ball Canning Booklet – usually for sale near canning jars and lids.