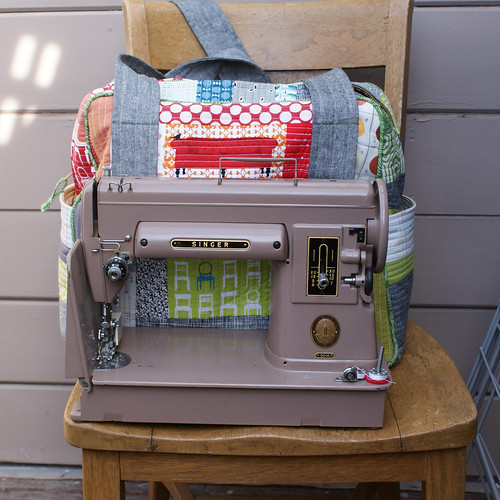
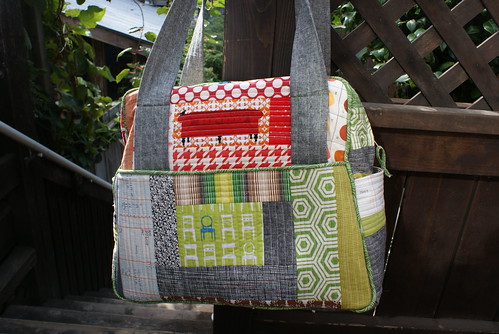
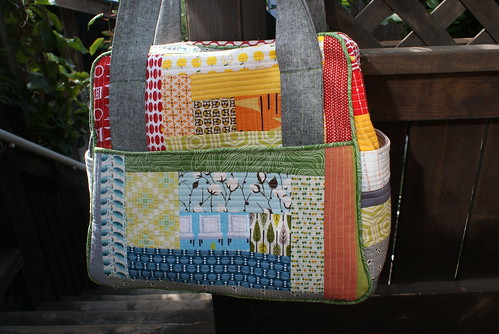
I made a quilt-as-you-go version of Amy Butler’s Weekender bag. Here are my notes.
I think that one of the most popular quilted versions of the Amy Butler Weekender Bag is the one by Oh, Fransson. Like Oh, Fransson, I used cotton duck (from my stash) and lots of long scraps of batting leftover from the edges of quilts.
Materials and construction
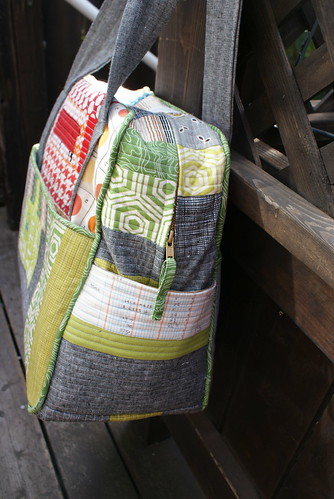
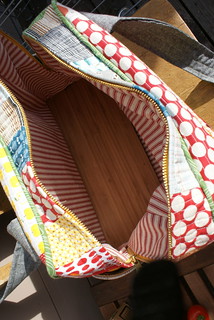
I bought my pattern locally at Stone Mountain and Daughter. The zipper is a #5 36″ separating zipper in buttercup from Zipperstop’s Etsy shop. The purse feet were purchased locally at Laci’s but if I had to do it again, I would check out Jo-Ann’s. I bought the biggest ones they had at Laci’s, but I think there was one slightly bigger made by Clover and Nancy Zieman. I recommend getting 6 feet. I tried to use only material from my stash. The outside is obviously scrappy patchwork and the inside was cotton ticking that I bought as a remnant a while ago. I used iron-in interfacing on the pocket panels, and 1 layer of Peltex in the bottom.
All parts were sewn using my Singer 201. I used the walking foot for the quilting, and cording foot to make the piping. The Singer 201 has tons of power, but I still had to go slow at the end when I was sewing through all of the layers of fabric.
Modifications
More references
The icing on the cake was the discovery that this bag makes the perfect carrying case for my singer 301.
]]>You get to create their beards as you organize your embroidery floss on the small guys:
And thicker crewel and needlepoint yarns on the larger guys:
Just pick the right size!
Check them out in the shop, and enjoy a discount of 25% off through the end of the month with the code instagram25 (and follow me on instagram for more deals!).
]]>In the Expo Hall:
Joona Re-upholstery classes
The Algae Lab Grow-your-own tank of spirulina
Bare conductive conductive paint
Bazaar Bizarre:
.retool. Seat belts made into wallets, card holders, and (my fave) passport covers
Bossa Nova Baby tiny hand stitched brooches
small adventure Artwork and illustrations
Novel Poster poster prints made from the complete text of novels.
Kimchi, Bread and Butter Pickles (cukes with onions and celery), Rhubarb Liqueur, Grapefruit Rhubarb Marmalade
]]>Projects I am considering:
[poll id=”4″]
]]>I went all out this time – I pulled the jumbo canning pot from the garage and kept going until I ran out of jars.
I made: Dilly Beans, Dill Pickles, Bread & Butter Pickles, Caraway (Purple) Cauliflower, Spiced Figs, Dill Pickled Okra, Random Dilled Leftover Vegetables from the Fridge.
Favorite canning reference materials in no particular order:
– Ball Blue Book of Canning I think I bought this at the store at the same time I bought my canning pot, but I am not quite sure. It has fantastic recipes and very thorough instructions for the beginner.
– Mustards, Pickles and Chutneys I got this at Half Priced books a long time ago. All of the measurements are metric, and I re-evaluate the acidity/preserving capability of each recipe because I think many of them were written for refrigerator storage.
– Summer in a Jar: Making Pickles, Jams, and More.. Genius book that has single-jar recipes. The smallest batch possible! I don’t have a full review of this yet, but the method involves adding many more spices directly to the jar than I am accustomed to. I am used to simmer ing the spices with the vinegar, and only adding a small selection of spices to the jar. I wonder if these recipes will be dramatically different in flavor….
Favorite local places to get canning supplies. In particular order with my favorite first:
1) Ace Pasttime Hardware, El Cerrito. Nice selection all year long. Ask an employee to show you where the canning supplies are, otherwise you could get lost in the maze of aisles.
2) The store formerly known as Big Longs (now converted to CVS). Tons of supplies all year, and open late! For your midnight jam sessions….
3) Berkeley Bowl. They have some canning supplies tucked under the produce. Limited selection that was totally picked over and not replenished by the end of October. But it is handy to get your dill heads and jars at the same place.
]]>I peeked in on my fiber at the UFS booth, trying its hardest to jump into the hands of passing customers.
While I was helping at the UFS booth, I tried needle felting. Jamie always has a little needle felting demo area set up, and usually I resist. I am not that into making things tangled, but she had these neat-o cookie cutter like forms so you could make shapes (see the center of the photo below), so I gave in.
Photo from maryjanesattic
It was pretty fun! Much funner than anticipated. I am blown away at what a small amount of fiber it takes to embellish something with felt. Spinners, save your scraps and you could make a felter have a stash that will set them for life. I am also impressed that Jamie’s needle felting kits include everything you need to get started – fiber, needles, and a natural foam pad.
I took off on Saturday to do some shopping with friends. I spotted an infamous and highly controversial rolling cart on its own in the wild:
So what did I buy? I already knew that I wanted a Tiger Cascade spindle from Carolina Homespun, so I made that purchase as soon as I arrived. On Friday, I got some CPH buttons from “Buttons!” (*jazz hands*). On Saturday I got two bags (6oz each) of Border Leicester/mohair from Toots LeBlanc. That’s it! Major restraint!
]]>The next time you see it, I will be wearing it at Stitches.
Thanks to Jamie at Urban Fauna Studio (booth #1036) and Krista from Pigeonroof Studios (booth #637), I am not just a Stitches West shopper, I am a seller! UFS has both my stitch markers and fiber, and Pigeonroof will have my stitch markers. Yay! I am really excited about this and plan to break some rules and snap some camera phone pics of my items on display. I am headed to stitches tomorrow and Saturday and will be helping out in the aforementioned booths so say hi if you see me. Also I will be doing a Hazel Rose loom demo on Saturday at 1 pm in the Demo area so come by if you want to see a little loom in action. I plan to tweet my adventures, so follow me for pics and updates.
Note to self: Go to Target tonight to stock up on “Adult Juice Boxes.”
]]>As a wee crafter, I spent many a holiday working on little holiday needlepoint and cross-stitch patterns that my mom hoarded during after-christmas sales. The first step (and the one that drove me INSANE when I was young) is to baste the edges of the canvas to prevent fraying. I dreaded doing it, but it was not nearly as tedious as I remember (can I possibly be more patient than when I was 8?). The next step was always to take of the thread from the project and attach to a yarn organizer. Miner were always butterfly shaped. Did anyone ever have one that WASN”T a butterfly? Anyway, i realized that this would be the step to stop adult-me in my tracks. I didn’t have a yarn organizer. With nothing to do all day but craft, and an awesome idea from Carmen, i decided to make my own.
i whipped out a sheet of Brown shrinky-dink plastic and threw together a retro-fabulous sketch of an owl. I planned out where to place holes that I could punch with my circular craft punches.
I made it the size of the entire sheet of plastic, and then cut it out (note pen for scale)
Then I popped it into the toaster oven at 300 until it shrank up (i used chopsticks to pull apart any areas that got stuck during shrinking).
I am really pleased with the holes of varying size – it is very satisfying to put the fat wads of yarn in the bigger holes, and the thread in the tiny holes. I added a rare earth magnet (with E6000 glue) to the center to hold on to needles, and then I got busy!
So busy, in fact, that I completed the whole thing!
The project was a new in package 1972 Caron Crewel 5 x 7 (#6306). The yarn was all wool (in some of the older projects the included yarn is acrylic) and the instructions were thorough. Highly recommended!
]]>Some things I want to do…
Not that I promise to stick to your suggestion… but I might! I can’t decide where to start. What do you think?
[poll id=”3″]
]]>