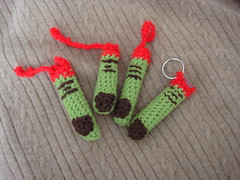
Monster finger chapstick cozy
Halloween is one of the most inspirational crafty-times of the year for me. I am still waiting the rare trip to Target to see which Halloween cuties they have out this year, but the gears are already turning. I am surrounded by ‘Lip balm for zombies’ from my friend Amanda. Then I saw an adorable severed zombie finger on etsy (I can call it adorable, right?). Then I realized the chapstick is the size of a finger, and viola! The monster finger chapstick holder is born!

If you have made any other amigurumi, you should be able to make this. I assume that you know how to increase, decrease, and start using a magic ring.
To make your own monster finger filled with chapstick you will need:
- Crochet hook – Size F
- Worsted weight yarn in three colors. I used Cascade 220 wool for the brown and green, and Caron Acrylic for the red.
- button (optional)
- key ring (optional)
This pattern has 3 parts. The fingernail, the finger, and the bloody severed top portion. I’ll give you the pattern for the fingernail first. If you are clever, you can make it first, and have it ready to sew on as soon as the finger is long enough. I always forget to do this.
Fingernail
The fingernail is worked in brown yarn, and is worked flat.
R1: Chain 5
R2 and R3: Sc into second from the end, Sc 3 more.
R4: Decrease twice. Pull end through.
Finger
Work 5 sc using the magic loop method.
R1: *sc 1, inc1 * repeat once. sc1 (7 sts)
R2: *sc2, inc1* repeat 3 times. sc 1 (10 sts)
R3-14: sc all the way around.
This is a big enough circumference for my standard sized chapsticks. After you are done with the increases, you might want to check to see if yours will fit. If not, sneak in another increase on the next row. Continue in the green color until you are just below the top of the chapstick. For me this was row 14. Change to the red yarn.
Severed top
There will be four loops that make up the severed finger top: one large one to wrap around the button, and three decorative – one of which can be used to attach a keyring.
R15: Sc in red
R16: chain 8, sc into base of chain to create loop (you just made the button loop). *Sc1, chain 3, skip1, sc * repeat 3 times (you just made the 3 decorative loops).
If you haven’t already done so, sew on the fingernail. Make sure to place the fingernail towards the “front” of the finger, which is the side opposite the large loop. I just whip-stitched along the edge with the chapstick in the finger so that I didn’t accidentally sew everything closed.
Use the brown yarn to add a knuckle. You can also use green to make some warts (french knots).
Attach the button to the front of the finger, at the top opposite the largest loop. Thread a keychain loop in one of the decorative loops if you wish. (detail photo of top loops)
Now you are ready to creep people out.
I expect that there may be errors in my pattern, so check back for updates (and let me know if my pattern doesn’t make sense!).
Pattern modifications
- Make a long grey fingernail to make it a witches’ finger!
- The fit of the finger is very snug. you might not even want a closure at the top. I think I like it best without one
- Some of the fingers in the pictures are constructed a little differently. Instead of a button closure, I threaded a crocheted chain through the loops to make a drawstring closure. you might prefer this if you aren’t going to attach the finger to a keychain. Plus it makes more creepy, bloody strings to dangle out of the finger.
- I have been addicted to softlips since high school. It is a more narrow chapstick than the standard size, I found that 7 stitches around was enough.